Unfortunately, no adorable baby model this time.
Little Mermaid Costume Pattern and Photographs
© Courtney Wiggers September 2015
Materials:
Worsted weight yarn (coral(A), multi-coloured(B), mint(C))
I used
Loops & Threads Wool to Wash 12 Pink for the top and Red Heart Comfort 4050
Teal for the tail
4.25mm crochet hook
5mm crochet hook
Tapestry needle (for sewing and weaving in ends)
Finished Size:
6-9 months
Abbreviations:
sc - single crochet
dc - double crochet
tr - triple crochet
MC - magic circle
2sc/2dc - worked in the same stitch; increase
sc #/dc # - amount of sc or dc to be worked in following individual stitches
slst - slip stitch
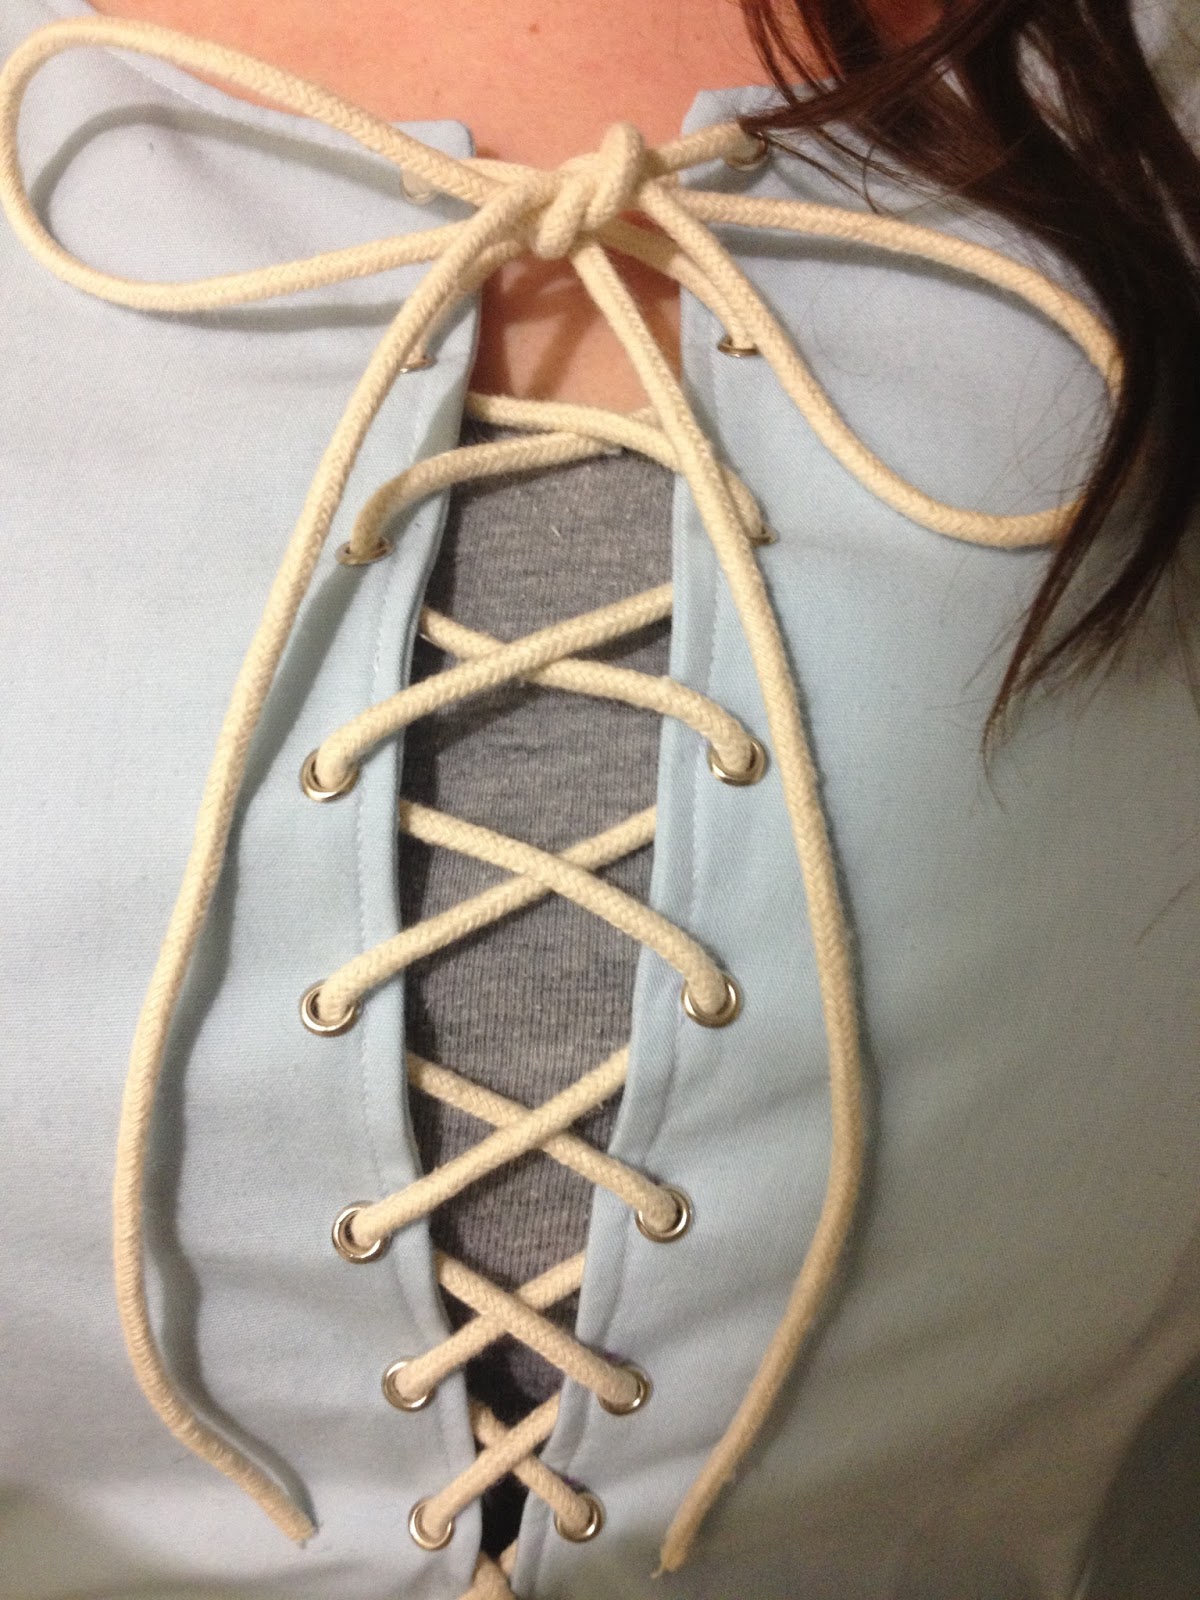
Starfish Top
(x2):
NOTE: You can also use worsted weight yarn and a 5mm crochet
hook for the top
With A yarn
and 4.25 hook
MC
R1: sc 5 in circle, slst to join (5)
R2: ch-1, *2sc* around, slst to join (10)
R3: ch-1, *sc 1, (dc, tr, dc) in next st* around, slst to
join
R4: ch-1, *sc 1, hdc 1, (hdc, dc, tr, dc, hdc) in next
st, hdc 1* around, slst to join
Fasten
off
Assembly:
Crochet a chain 5-6
to attach the starfishes together, then make four ties approximately 40 chains
in length and attach them to your preference

Mermaid Tail:
With B yarn
and 5 hook
MC, ch-2
R1: dc 12 in circle, join (12)
R2: BLO, dc 12 around (12)
R3-5: dc around (12)
R6: *2dc, dc 5* twice (14)
R7-8: dc around (14)
R9: dc 4, *2dc, dc 4* twice (16)
R10: dc around (16)
R11: *2dc, dc 3* around (20)
R12: dc around (20)
R13: *2dc, dc 4* around (24)
R14: dc around (24)
R15: *2dc, dc 3* around (30)
R16: dc around (30)
R17: *2dc, dc 2* around (40)
R18: dc around (40)
R19: 2dc, *dc 2, 2dc* around (54)
R20-40: dc around (54)
R41-42: sc around (54)
R43: *sc 2, ch-1, skip a sts, sc in next 2 sts* around
(you’ll end with a ch-1)
R44-45: sc around (54)
Fasten
off

I’ve included two patterns to make the fins (they turn out looking very
similar but one requires more sewing in the end and the other is maybe a higher
difficulty level)
Fins (x2):
With C yarn
and 5 hook
ch-23
R1: in 2nd ch from hook, dc across (22)
R2: ch-2, dc2tog, dc across
R3: ch-2, dc across (21)
R4: ch-2, dc2tog, dc across
|
R6: ch-2, dc2tog, dc across
R7: ch-2, dc across (19)
Fasten
off
This is the original pattern for the fins (there is more
sewing involved in making it this way)
Assembly:
Sew together
approximately ¾ of the way down the shorter sides so that the angle of the fins
create a ‘V’ shape

OR
Fins (V.2):
With C yarn
and 5 hook
ch-23
R1: in 2nd ch from hook, dc across (22)
R2: ch-2, dc2tog, dc across
R3: ch-2, dc across (21)
R4: ch-2, dc2tog, dc across
|
R6: ch-2, dc2tog, dc across
R7: ch-2, dc across (19)
R8: slst 5, sc across (14)
R9: ch-1, sc 14, ch-6 (14)
R10: in 2nd
ch from hook, dc across (19)
R11: ch-2, dc across, 2dc in last st
R12: ch-2, dc across (20)
R13: ch-2, dc across, 2dc in last st
R14: ch-2, dc across (21)
R15: ch-2, dc across, 2dc in last st
R16: ch-2, dc across (22)
Fasten
off
While there is less
sewing involved in this version of the fins, they may be a little more
difficult to get right (the advantage is that these fins are one-piece)

Assembly:
Make a chain
long enough to form a drawstring around the waist or alternatively you can use
ribbon to weave through the spaces in R43
To sew the
fins onto the tail, place the bottom end of the tail in the center of the fins.
Then, fold the two square corners of the fins over the end of the tail so that
they form a ‘V’ shape along the front of the tail. Sew around to secure onto
the tail
NOTES:
To adjust the
size of the tail, there’s two main places to add or lose length. You can add or
take away rows R3-5. Also, to make the tail bigger, you can add increases by
repeating R16-17 after you complete R19.
To fasten off when you finish the round,
skip a stitch, slip stitch in the next stitch.
This
pattern is copyrighted and provided with understanding that you may NOT sell, alter, or share the pattern.
Also, if
you intend to sell items made from this pattern, I simply request that you link
back to my shop or to this pattern.


That’s it! I’d love to see your finished
products and I hope you enjoy this pattern as much as I do!
If you have questions, don’t hesitate to email
me:
Courtney17_17@hotmail.com
Courtney17_17@hotmail.com