Classes have been crazy. Literally between the start of the semester and now, my program group has dropped from 108 students to approximately 95 students. That's an almost 10% decrease in my potential graduating class. And we still haven't gotten to the hardest semester yet! (Apparently, semester 3 is the worst).
On a happier note, I passed all of my midterms! I did really well on both of my practical midterms, Vital Signs and Medical Administration (inc. Inhaler), so I'm feeling pretty happy right now.
All this craziness is why I haven't been updating lately. I had all these ideas for crochet projects and I'm expected to make presents for several baby showers and I have classmates requesting things and it's all just been a little too much. Right before Christmas last year I got really into making patterns for dinosaurs. I made two Plesiosaur prototypes, a baby T-rex pattern, and I have a Parasaurolophus that's finished, but not yet sewn together.
My Plesiosaur is my favourite; they're my fave dinos ever! And it looks so cute with it's little head and little tail and little itty bitty fins, I just love it!
If anyone's interested in the patterns, I've been contemplating putting them in my pattern shops so let me know if that's something that I should do :)
~ Courtney
Showing posts with label courtney. Show all posts
Thursday, 18 February 2016
Friday, 16 October 2015
Red Riding Hood Inspired Costume, Part 1
The Dress
This year for Halloween I've decided to be Red Riding Hood, with my costume inspired by the movie released in 2011. If you know me, you'll know that my costumes for Halloween are mainly limited to anything I can make from fabric on the clearance shelves, or a witch. Most often than not, I'm a witch. Last year, however, I purchased fabric that would have made for an awesome Rapunzel dress; unfortunately, it was my first time ever trying to make a costume and it really didn't turn out that great (my boyfriends costume was amazing, though). I resolved to do better this year.
For the dress I used the Butterick 4827 pattern (modified slightly) and used a light blue heavy linen fabric that I purchased at Fabricland.
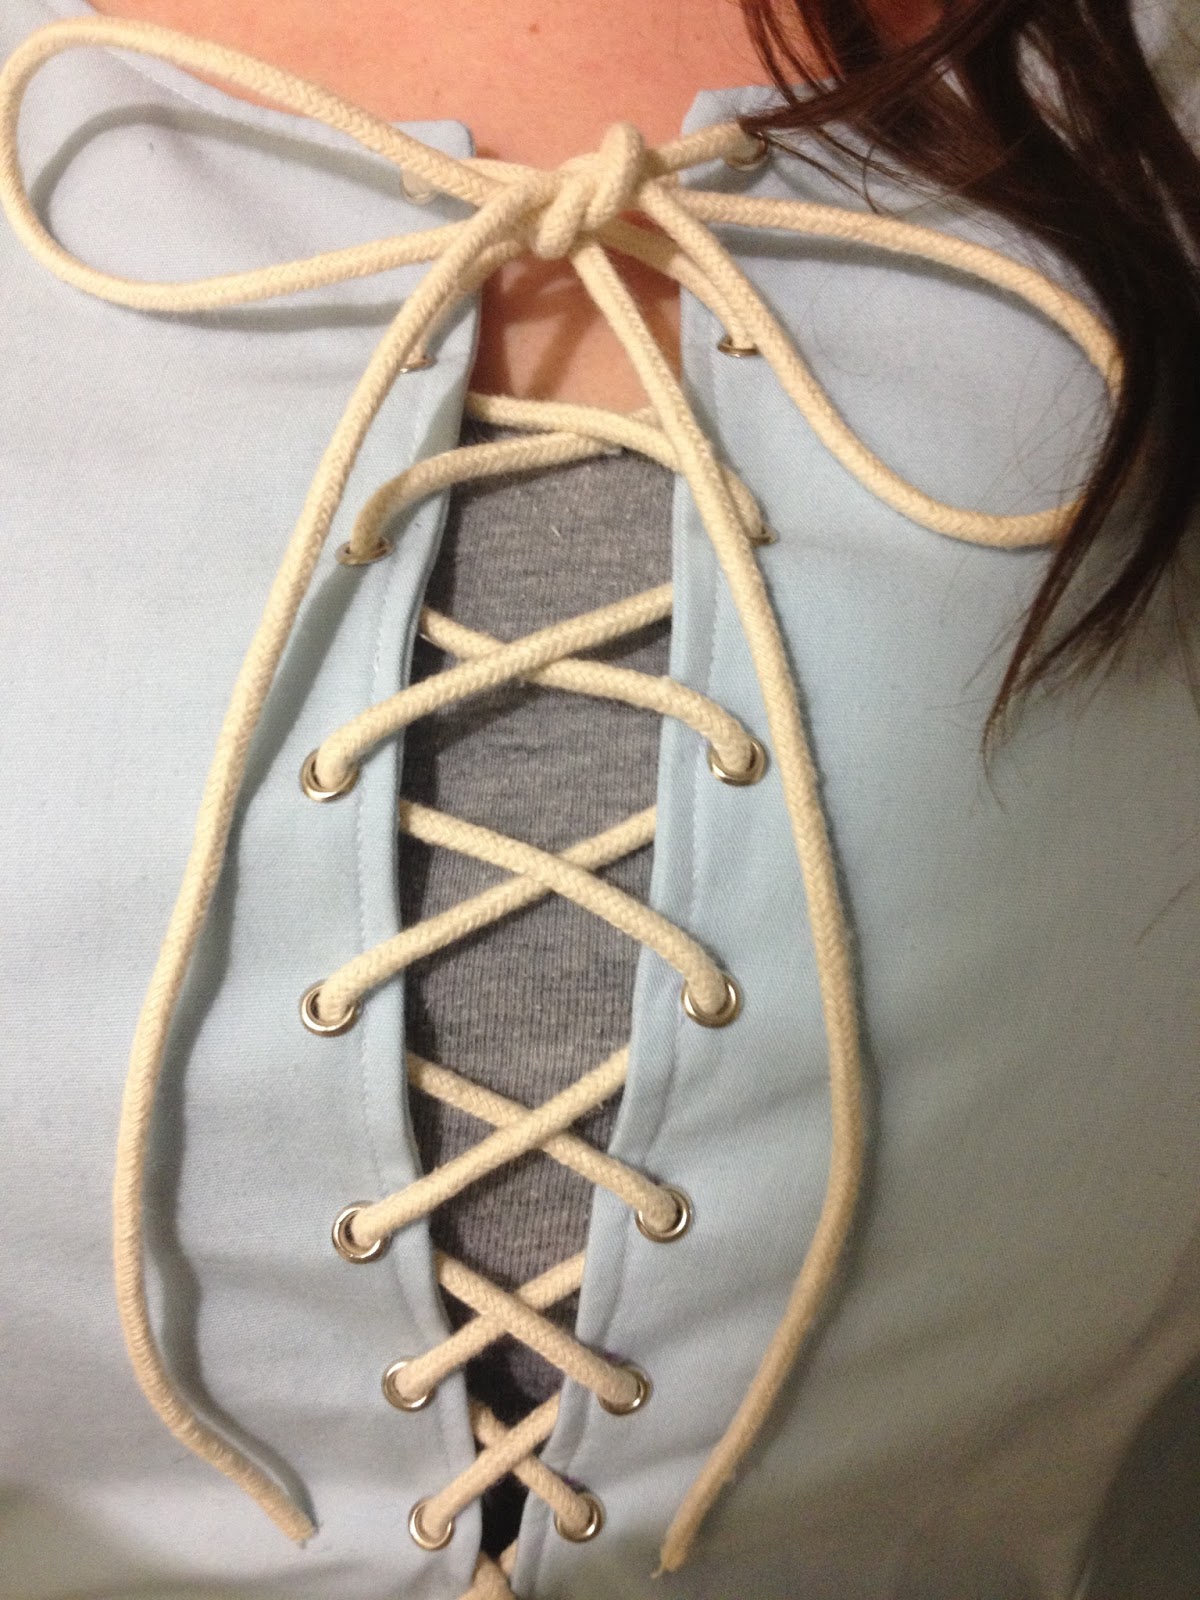
I ended up modifying the pattern to make the end product look more like the blue dress Valerie wears in the movie. Instead of having it lace up in the back, I cut the front and added lacing. I also modified the sleeves to make them 3/4 length instead of full. Before starting, I attempted my first ever fashion design sketch which I think actually turned out pretty nice.
Once I'd decided how I wanted the dress to look, I found a pattern that matched fairly well and picked out the fabric I liked. To be noted: this was the first time I've ever picked out fabric for a Halloween costume that wasn't on the clearance rack. The fabric I bought was 60" wide so I ended up using a lot less than the pattern called for, although I did make the biggest size just in case. I usually have a problem with patterns where the bust and hips are too small and the waist too large. I also didn't use all the pieces the pattern called for. I modified the pieces for the front and back facing so that I could make laces up the front. I just traced the pattern pieces onto paper and cut off the lacing support from the back facing and attached it to the front. I did end up cutting the front facing piece shorter so that it only went down to the waistline.
After I had modified what I need to and pre-washed the fabric, I started pinning and cutting (it was a lot of fabric to work with and it's actually really heavy).
Once I had all the pieces cut out I followed the directions given by the pattern to sew it all together. The below picture is the front of the dress. I ended up cutting a slit down the front center to the waistline for the front lacing.
I don't have any more progress pictures mostly because I hadn't yet bought the eyelets for the lacing and once I cut the slit down the front, it refused to stay on my shoulders. All of the pieces got sewn together, I top stitched around the neckline, and I added eyelets and lacing.
And then it was a dress! A badly fitted dress mind you, but a dress.
I really hated how it was fitting. I saw pictures of dress made from the same pattern and I felt like mine was way too big up top. I do have a smaller waist and this dress made me look much bigger than I actually am. It was really loose so I turned it inside out, pinned it to be a little tighter, and took it in quite a bit. And this is the finished dress!
In my opinion it looks much better now (Shayne agrees although he did suggest I should have made the lacing a little bit looser..... boys.). I say finished but I still have to hem the bottom edge. Doing this project and having to take the dress off after having pinned it does make me realize the need for a dress form. It went on my Christmas list after having been poked by a pin the fifth or sixth time trying to get the dress off.
So that's it! I still have to make my red cloak but I'll make another post for that (I actually already have one made but Shayne disapproved of the fabric and ordered me some new stuff). My friend is a budding photographer and she's been really excited for me to finish the costume so that she can use me in a photoshoot. If she gets some good shots I'll be sure to update with them!
This year for Halloween I've decided to be Red Riding Hood, with my costume inspired by the movie released in 2011. If you know me, you'll know that my costumes for Halloween are mainly limited to anything I can make from fabric on the clearance shelves, or a witch. Most often than not, I'm a witch. Last year, however, I purchased fabric that would have made for an awesome Rapunzel dress; unfortunately, it was my first time ever trying to make a costume and it really didn't turn out that great (my boyfriends costume was amazing, though). I resolved to do better this year.
For the dress I used the Butterick 4827 pattern (modified slightly) and used a light blue heavy linen fabric that I purchased at Fabricland.
I ended up modifying the pattern to make the end product look more like the blue dress Valerie wears in the movie. Instead of having it lace up in the back, I cut the front and added lacing. I also modified the sleeves to make them 3/4 length instead of full. Before starting, I attempted my first ever fashion design sketch which I think actually turned out pretty nice.
Once I'd decided how I wanted the dress to look, I found a pattern that matched fairly well and picked out the fabric I liked. To be noted: this was the first time I've ever picked out fabric for a Halloween costume that wasn't on the clearance rack. The fabric I bought was 60" wide so I ended up using a lot less than the pattern called for, although I did make the biggest size just in case. I usually have a problem with patterns where the bust and hips are too small and the waist too large. I also didn't use all the pieces the pattern called for. I modified the pieces for the front and back facing so that I could make laces up the front. I just traced the pattern pieces onto paper and cut off the lacing support from the back facing and attached it to the front. I did end up cutting the front facing piece shorter so that it only went down to the waistline.
After I had modified what I need to and pre-washed the fabric, I started pinning and cutting (it was a lot of fabric to work with and it's actually really heavy).
Once I had all the pieces cut out I followed the directions given by the pattern to sew it all together. The below picture is the front of the dress. I ended up cutting a slit down the front center to the waistline for the front lacing.
I don't have any more progress pictures mostly because I hadn't yet bought the eyelets for the lacing and once I cut the slit down the front, it refused to stay on my shoulders. All of the pieces got sewn together, I top stitched around the neckline, and I added eyelets and lacing.
And then it was a dress! A badly fitted dress mind you, but a dress.
I really hated how it was fitting. I saw pictures of dress made from the same pattern and I felt like mine was way too big up top. I do have a smaller waist and this dress made me look much bigger than I actually am. It was really loose so I turned it inside out, pinned it to be a little tighter, and took it in quite a bit. And this is the finished dress!
In my opinion it looks much better now (Shayne agrees although he did suggest I should have made the lacing a little bit looser..... boys.). I say finished but I still have to hem the bottom edge. Doing this project and having to take the dress off after having pinned it does make me realize the need for a dress form. It went on my Christmas list after having been poked by a pin the fifth or sixth time trying to get the dress off.
So that's it! I still have to make my red cloak but I'll make another post for that (I actually already have one made but Shayne disapproved of the fabric and ordered me some new stuff). My friend is a budding photographer and she's been really excited for me to finish the costume so that she can use me in a photoshoot. If she gets some good shots I'll be sure to update with them!
Monday, 29 December 2014
Dinosaurs? DINOSAURS!
I've been going dinosaur crazy over the last few months since the new Jurassic Park movie trailer came out! Now, dinosaurs have always been a pretty big obsession of mine (though not as nearly as obsessed with them as my older brother is; he actually works at a dinosaur museum). Ever since the trailer came out though, dinosaurs have been everywhere and I want to buy them all! It also is giving me a reason to wear my Jurassic Park dress again!
That's right. A Jurassic Park dress.
I made it a few years ago when the first movie got re-released in 3D. I refused to go see it in the theatre until I had finished sewing this dress.
That's right. A Jurassic Park dress.
I made it a few years ago when the first movie got re-released in 3D. I refused to go see it in the theatre until I had finished sewing this dress.
I've never been more proud of anything in my life.
Walmart was actually clearing out all their kids dinosaur bedroom stuff a few months ago and I literally had to buy it all (future children, I'm sorry if you hate dinosaurs because of me). I got a few extra of the dinosaur curtain panels though because they're a really nice blue with dinosaur outlines on them and I want to make another dress or shirt or skirt out of them. (I'll post a picture later)
I have a feeling dinosaurs are going to be very popular again and that might not have been the best idea on walmarts part.
I did use a pattern for the dress but I'm not completely sure which one. If I ever find out, I'll update this post with it.
Also, I got dinosaurs things (AWESOME DINOSAUR THINGS!!!) for Christmas this year, but I'll make a separate post about that when I get pictures of them. My boyfriend is so talented :)
Monday, 15 September 2014
Puffy Stitch Safety Earwarmer
Puffy
Stitch Safety Earwarmer
©
Courtney Wiche 2014
Red Heart Reflective in Purple
6.5 crochet hook
Tapestry needle
To adjust the width of the earwarmer, just chain a
multiple of 3 + 2 sts (I started with 14 chains for an adult sized earwarmer, and 11 for a child)
Ch 14
R1 – in 2nd ch from hook (sc, hdc, dc), skip next 2 chs,
*(sc, hdc, dc) in next ch, skip next 2 chs, repeat from * across, ending with a
sc in the last ch, turn.
R2 – ch 2, in first sc (sc, hdc, dc), *skip next 2 sts,
(sc, hdc, dc) in next sc, repeat from * ending with 1 sc in top of turning ch,
turn. NOTE: you will be making each cluster in the sc sts of the last row
Repeat row 2 until piece measures desired length (mine
ended up being about 18” unstretched). Fasten off and sew ends together.
I am absolutely in love with this yarn! The reflective strand that runs through the yarn is a little bit scratchy when you're working with it, but the final product is actually pretty soft. There's also a neon pink colour that I want to get to make for my cousin because it's so cute!
Sunday, 24 February 2013
Brynnleigh's Super Simple Socks
I recently got a whole bunch of balls of sock yarn for babies (thanks Grandma) and my 2 year old cousin Brynnleigh decided she really wanted this blue pair and a pink pair, so that's been my weekend so far. I wasn't really finding a pattern for toe-up toddler socks that I liked so I basically just winged it and here we go. Keep in mind this is my first knitting pattern so please don't hesitate to tell me if there's anything wrong. Here we go!
Brynnleigh’s Super Simple
Socks
©
Courtney Wiche 2013
Materials
US 3 (3.25mm) 24” circular needles
Yarn: My First Regia by REGIA (25g ball, col. Marco,
approx 105 m)
Gauge: 7 stitches, 10 rows = 1”
Finished size: 4.10” long x 3.5” tall (approx 1-2 years)
This pattern is created toe-up using Judy’s magic cast-on
R1: Using Judy’s magic cast-on, cast on 9 stitches on
each needle (18)
R2,4,6,8,10: knit
R3: [k1, m1, k7, m1, k1] twice (22 sts)
R5: [k1,m1,k9,m1,k1] twice (26 sts)
R7: [k1,m1,k11,m1,k1] twice (30 sts)
R9: [k1,m1,k13,m1,k1] twice (34 sts)
R11: [k1,m1,k15,m1,k1] twice (38 sts)
R12-36: knit (38 sts)
Work short rows splitting heel in 5-9-5 sts
Basic
How-To Tutorial -> http://www.youtube.com/watch?v=zu5YAKsAEpY
R37-45: knit (38 sts)
R46: knit, decreasing 3 sts (35 sts)
R47-50: [k3,p1,k2,p1] around
You
can continue rib for as many rows as you’d like to increase height of socks
BO loosely (very loosely; I did it too tight the first time and then I had to take it apart and redo it which is a pain in the ass)
Viola! I hope you enjoy it. :)
Sunday, 23 September 2012
I finally got around to putting up an Etsy shop
If anyone's interested, you can find it here -> Wichecraft
I'll be selling completed crochet items, jewelry, all my nerdy creations, and other random things that I decide to post.
The money I make will go directly back into more yarn/crafting supplies, and also my University fund seeing as it costs an arm and a leg (and my soul).
AKGHFAH;ALK;DG JUST LET ME CROCHET YOU THINGS
I'll be selling completed crochet items, jewelry, all my nerdy creations, and other random things that I decide to post.
The money I make will go directly back into more yarn/crafting supplies, and also my University fund seeing as it costs an arm and a leg (and my soul).
AKGHFAH;ALK;DG JUST LET ME CROCHET YOU THINGS
Wednesday, 27 June 2012
Hunger Games Katniss Everdeen Inspired Girl On Fire Beanie
Inspired by Cinna’s many designs (I hope he’d be
impressed)
6.00 and 5.50 hooks
Sensations Angel Hair yarn (I think the colour is called
Berry?)
This
is more of a colour/yarn-specific pattern, so I highly recommend using the
exact yarn
Using 6.00mm hook
Magic circle
1: ch 3, dc 11 in circle (12)
2: 2 dc in each st around (24)
3: *dc in next st, 2 dc in next st* around
4: *dc in next 2 sts, 2 dc in next st* around
5: *dc in next 4 sts, 2 dc in next st* around (you’ll
find that there won’t be enough stitches for the last few sts, so dc in next 2 sts, then
2 dc in next st)
6 -10: dc around
Switch to 5.50mm hook
11-14: *fphdc in next st, bphdc in next st* around
To
fasten off, skip a st and then slst
And there you have it!
(Not gonna lie, I’m really tempted to use it for part of
a Katniss/Peeta Victory Tour cosplay and take pictures, except for the obvious
fact that I’d need a Peeta . . .)
Sunday, 29 April 2012
District 12 Inspired Headband
3.75mm
You know, I don’t even know what kinds of yarn I’m using
half the time, so I can’t tell you . . .
Primrose Flower:
mc
1: ch 2 (count as first st), 5 dc in mc (6)
2: *hdc, ch 2* 5 times (6 spaces) sl st to last st
3: ch 1, *dc, dc 2, tc 3, ch2, dc, sl st to hdc of
previous row* in each space
Fasten
off
Leaves (make 2):
1: ch 10, sl st in 2nd ch from hook, sl st, sl st, sc,
hdc, dc, tc, dc, *hdc, sc, sc, sc, hdc* in final ch
2: (on opposite side) dc, tc, hd, sc, sl st
3: (to make the band) sc in next st, ch 66
Fasten
off
Attach the leaves between the petals on opposites side
and voila!
Friday, 27 April 2012
District 4 inspired Baby Hat
Perfect for your own little Finnick or Annie!
District 4 inspired Baby Hat
Size: 0-3mo
5.0m hook
Abbreviations:
mc - magic circle
ch - chain
dc - double crochet
hdc - half-double crochet
st - stitch
R1: using magic circle, ch 2 (counts as first stitch), dc
8 in mc (9) (DO NOT JOIN)
R2: 2 dc in each st around (18)
R3: *2 dc in next
st, dc in next st* around (27)
R4: dc around (27)
R5: 3 dc in next st, *skip a st, 3 dc in next st* around
R6-11: skip a st, 3 dc in next st around (you can change colour here)
R12: skip a st, hdc around
Fasten off
If you find the pattern is too small (I used a bamboo yarn that stretches a lot) you can add this between R3 and R4 -> *2 dc in next, one dc in next 2 sts* around
Thursday, 26 April 2012
Mermaid Costume Pattern
I made this costume for my cousin Brynn last Halloween.
NOTE: I put a lot of time into creating this so that I wouldn't have to pay for it, so I'd really appreciate if you didn't sell what you make from it. Personal use only, please!
Size
H hook
Worsted weight yarn
This makes a size 9-12 months approximately. If you're looking to make it smaller, try using baby yarn and a G hook. To make it bigger, chunkier yarn and an I or J hook.
Worsted weight yarn
This makes a size 9-12 months approximately. If you're looking to make it smaller, try using baby yarn and a G hook. To make it bigger, chunkier yarn and an I or J hook.
Starfish Top:
Mc
R1: sc 5 times in mc, sl st to join (5)
R2: ch 1, 2 around, sl st to join (10)
R3: ch 1, sc in same st, dc, tr, dc in next st, *sc in
next st, dc, tr, dc in next st* around, sl st to join
R4: ch 1, sc in same st, hdc in next st, hdc, dc, tr, dc,
hdc in next st, hdc in next st, *sc in next st, hdc in next st, hdc, dc, tr,
dc, hdc in next st, hdc in next st* around, sl st to join
Fasten
off
Make four ties approximately 35 chains in length and
attach them to your preference
Mermaid
Tail:
(This is made by joining at the beginning of each row and ch 2 (this does NOT count as a stitch!). You can also try making it without joining it, but at the time that I made this pattern, I wasn't really comfortable with marking stitches, but have at 'er!)
Mc
R1:
12 dc in circle (12)
R2:
Blo, dc 12 around (12)
R3-9:
dc 12 round (12)
R10:
dc 1 in next 3 st, dc 2 in next st* around (15)
R11:
dc 1 in next 2 st, dc 2 in next st* around (20)
R12:
Dc around (20)
R13:
Dc 1 in next 2 st, dc 2 in next st* around (28)
R14-17:
Dc around (28)
R18-19:
Dc 1 in next 2 st, dc 2 in next st* around
For optional increase, repeat R13 (48)
R20-45: dc around
R46-47: sc around
R48: sc in next 2 st, ch 1, skip a st, sc in next 2 st*
around
R49-50: sc around
Fasten
off
Make a chain long enough to form a drawstring around the
waist (you’ll weave this through the spaces in R48)
Fins (make 2):
Ch 23
R1: Dc across
R2: Ch 2, dc2tog, dc across
R3: Ch 2, dc across
R4: Ch 2, dc2tog, dc across
R5: Ch 2, dc across
R6: Ch 2, dc2tog, dc across
R7: ch 2, dc across
Fasten
off
If the fins are confusing, you can try using these:
You should only sew the fins together about three-quarters of the way
Fold the corners over and sew the corners to the end of the tail (sew around; make sure it's connected)
And there you have it!
For everyone who was waiting a really long time for this pattern, I'm sorry, but I didn't have access to the costume for the longest time so I couldn't try and write it down.
This pattern hasn't been tested except for by me, so any feedback or revisions would be appreciated. If something's unclear, feel free to ask me about it. The beading and sequins wasn't done by me, it was done by my aunt.
Tuesday, 17 January 2012
Experimenting with Photoshop-like-programs
I've been trying to digitally colour some of my art for a long time, and I used to just commission other artists to do it, but I wanted to try by myself. I'm fairly happy with the results of it. :)
Again, sorry for the Supernatural references. I can't help it.
Me (also my first attempt at using photoshop)
If I ever met Jared Padalecki . . .
Dean and Cas
^^^ This is a reference to therandomactorg.tumblr.com They are an AMAZING charity, if anyone would like to donate. :)
Again, sorry for the Supernatural references. I can't help it.
Subscribe to:
Posts (Atom)
Little Mermaid Costume - Updated
It's finally here. An updated version of my little mermaid costume (with proper math this time). Unfortunately, no adorable baby...
-
Mermaid Costume Pattern I made this costume for my cousin Brynn last Halloween. NOTE: I put a lot of time into creating thi...
-
Mustache Necklace Pattern Courtney Wiche This is honestly probably the most simple pattern I have ever made, and I absolutely love it. It...
-
1: With white yarn, sc 6 times in magic circle (6) 2: 2 dc around (12) 3: repeat row 2 (24) 4: *2 dc in next st, dc in next st* to end ...